A wonderfully generous friend and book club lady, gave me a lovely Thirty-One Gifts purse. I liked its slim profile and adjustable strap immediately. Until I tried to carry it as purse. Who am I kidding? I am not at a point in my life, where a slim purse will do. Maybe when I go out to dinner with H or a night on the town with friends.
I need a super-sized, shoulder murdering, carpet bag. I still seem to be carrying around everyone's stuff. Plus I tend to travel with a notebook and pens and sunscreen and many other "just in case" items.
Nope-- no slim purses for me.
But I like it. It is so pretty. Admittedly it has been very pretty hanging on the closet door. Until Friday. I was packing for my trip and I needed something to slip my kindle, headphones, iPod and related cords into. My camera too... I wanted all my electronic gizmos, in one bag.
Then it hit me. My Thirty-One Gifts purse, would be perfect, with a few modifications.
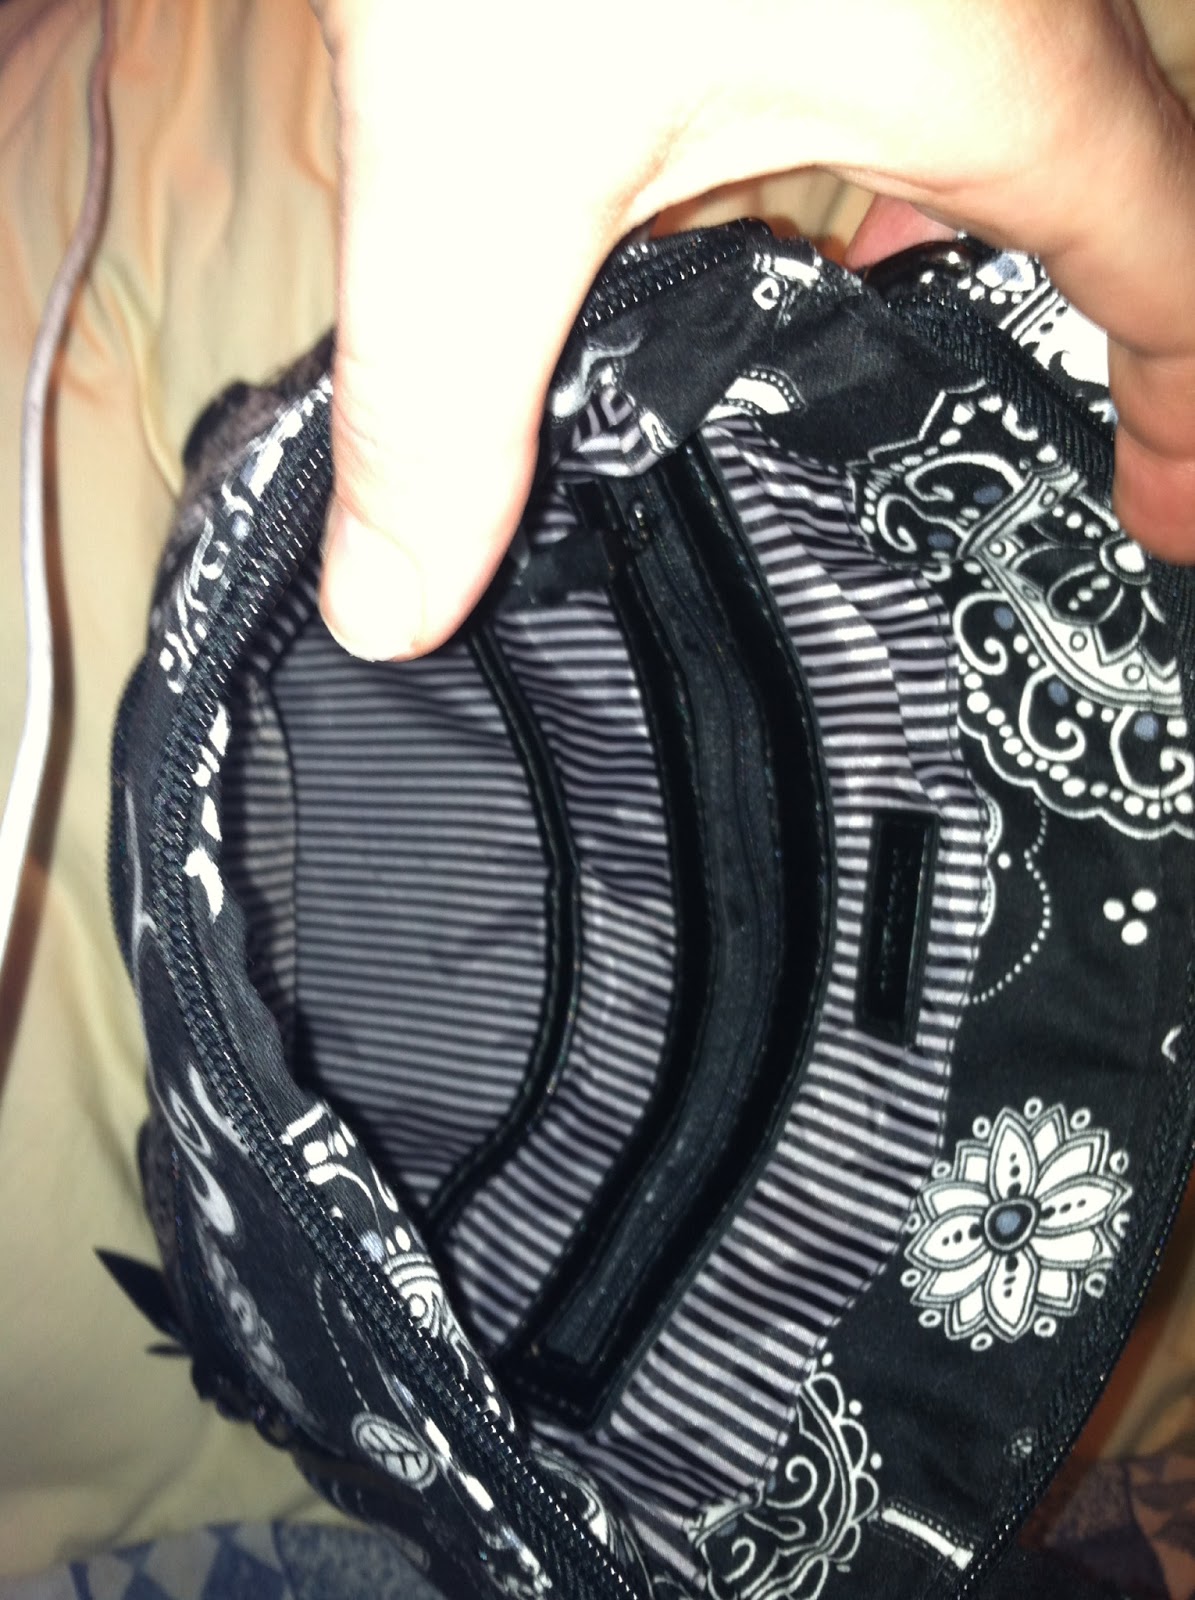
It really is a cute bag. But with a super long strap.
And the interior pockets will be perfect for slipping in my camera, iPod and cords. With my kindle, it will still be slim enough to slip neatly into my carry on bag.
At first I thought I would use my seam ripper and just remove the strap altogether. That however was a no-go. As a well constructed bag, it has the straps nicely attached.
Then I decided, well a bit of a strap would be helpful.
So I cut the straps and then sewed them down, careful to double them over, to avoid fraying.
I created a carrying strap using the hardware already on the bag.
And a tab detail. I used a zigzag stitch as it will show.
I am pleased with my quick repurposing and cannot wait to try it out. I think it will be just perfect.
In the coming weeks I will be migrating this blog, to my own website. I bought the domain -- susansthoughtsfromtheedge.com. I am going to build my own website using WordPress. Changes are also coming to my business, which after a hiatus, is reemerging, slightly new and different focus.
This January I took Allison Lehman's WordPress class and I finally feel empowered and competent enough to build my own space. That is coming in March. I will likely shift my blogging focus a bit and my plan is to try and refocus my writing.
This blog is not going away. I will leave it up. Instead of trying to import nearly 7 years worth of posts into the new space, I will link to this blog, so that people can look back if they want to. Some of the really good posts, I will likely repost and many of my DIY projects may make a reappearance.
Why am I changing? Well, blogger has made some updates and honestly, for new bloggers or those who want to blog and go, I can 100% say Blogger's platform is the way to go. It is easy. This is why I have stayed here for 7 years. This last upgrade, in my opinion was actually a slight step backwards. My skills and blog aesthetic have outgrown Blogger and frankly all the cool kids are talking WordPress.
WordPress is really flexible and it has some neat bells and whistles. I have used the back end of WordPress for years-- carefully posting content for clients and hoping like hell, I didn't accidentally blow anything up. Well now, I am going to try building my own place, from the ground up.
My goal is to have this all finished by the end of the first quarter 2013. So hang tight... change is coming and soon.
I watched this tutorial and followed her instructions to the letter. It was easy. The results were fantastic.
So I started with the fabric I had purchased for the very special draw string bags I made this fall. Even thought I bought a remnant, it was nearly a yard! I had more than enough for the bag and two pillows.
It is no secret. I am horrible at cutting fabric. So I made a pattern. I followed the instructions in the video and I used an old atlas to make a pattern. It worked like a charm.
After cutting the fabric using my pattern, I hemmed the edges of the fold as instructed and then pinned the back to the front, right sides facing. Then you simply sew the square together. This is so easy.
And they are simply beautiful.
I used a simple silk on the back. So elegant.
I made these for the almost staged living room. The chairs are a great peacock blue velvet. I love them, but wanted a throw pillow. The pillows really have a touch of every color we have going in the living room, which ties it all together very nicely.
This project required no materials, as I had the fabric and the pillow inserts. I would estimate it took me maybe an hour or so, from start to finish.
I made this a good while back, it was only as I was repairing it, that I decided I should feature it on the blog.
L had this skirt when she was in preschool. My mom got it for her and it was a favorite. She wore it, until one day, she ripped one of the tiers and I couldn't fix it but I hated to throw the skirt away.
I found some pink purse handles at JoAnn's and decided that I could re-purpose this favorite.
Step one: Turn skirt inside out. Cut to size if needed. I think a skirt with an A-line will work best, but having said that, a straight one would work too.
Step two: Turn the skirt inside out and sew the bottom closed. I double stitched mine. You could reinforce the bottom too, if you wanted to.
Step three: Decide if you want to have a closure of some sort on the top. Since this was an adjustable waist skirt, I rigged up a closure using the existing button holes. I will be the first to admit, that this did not survive for very long. L and I have decided she does not need a closure, she can stuff more in it without one.
Step four: Figure out the placement of your handles. I used very sturdy bias tape this time. The first time, I used some of the fabric from the lower hem, that I had cut off. My first attempt was stylish and held up for a good while, but my recent repair went more for substance, less style. Really it is a personal preference. I would double or triple stitch the handle loops and back stitch for good measure.
And Viola! You have a purse from a skirt. L carries this around all the time. She loves it.
When S and I were texting this summer about the wedding, I said I wished I lived closer, so I could help with the wedding. Without missing a beat, she took me up on my offer. She wanted me to use my mad sewing skills...
As a point of clarification, I do not have mad sewing skills. I have, however, over a period of time taught myself to sew. I have a long ways to go. What I would like to be able to do and what I actually can do vary greatly. I also really need to make friends with my mother's sewing machine, which is a much spiffier model than the one I am using.
I digress. So S needed a cute, modern drawstring bag for the breaking of the glass. In case you didn't know and slept through Yentl, at a Jewish wedding, the couple break a glass at the end. The glass is in a bag and the bag gets stepped on.
There are a variety of symbols associated with this custom, but in this case J and S choose to temper the joy of their day, by noting that not every couple who wishes to marry, can legally marry and while they celebrate their marriage, they take a moment to pause and reflect that not everyone is so blessed. (I cried as the Rabbi read the explanation...)
I was so incredibly honored to sew this bag for them. What a wonderful gift they gave me. A chance to participate and create something beautiful for them.
S also gave me alot to work with. She sent me links to bags she had looked at, her pinterest wedding page, and dimensions.
Had I been more together, I might have shopped before the trip to Sarasota, but I wasn't that together, so I ended up shopping right after the kiddos went back to school. I was looking for grey fabric, with accents of teal and orange.
As I texted S, grey was SO LAST YEAR!
I will admit the fabric proved challenging. I spent a long time in JoAnn's searching and searching. If I had it to do over again, I think I would have searched online. In any event, I decided on a remnant of one and a good solid choice for the other. I ended up making two bags, so that they could choose which one worked the best. One was more romantic and the other more tailored.
The tailored bag, was nearly technically perfect. The more romantic one was really a stretch for my skill set and the fabric was a challenge to work with.
They ended up using the tailored bag.
I have to say I was pleased with both of them... It was a project of love and I would do it again in a minute...
So-- what I know you all want to see, pictures and my process.
For bag number 1-- the tailored bag, I used some high quality quilting cotton and some fusible interfacing. Ideally I would have been able to find a coordinating cotton and lined the bag that way, but sadly... nada... I struck out, so I simply used the same fabric for both the lining and the outside.
I watched this video as a refresher to making a draw string bag, which honestly is a very basic sewing skill, that I think all aspiring seamstresses should have in their bag of tricks. It is a handy little skill.
Before cutting my fabric, I fired up the iron and created a doubled sided piece of cloth.
Step 1: Cut two pieces of cloth and place the fusible interfacing in between, wrong sides of the fabric together.
Step 2: Once you have double sided fabric, measure and cut the fabric to your specifications using whichever method/pattern you have chosen.
Step 3: I decided to add some bias tape to the upper hem, for a nice look and to make the bag a bit stronger.
Step 4: I threaded the cord thru and then decorated with orange and teal beads, to make the bag match the colors I knew S and J were using for their wedding.
A peak inside the bag!
I love how this one turned out!! It was technically near perfect. I agreed with S that cotton would be less likely to be slippery, I don't think the utility of the fabric took away from the elegance of the bag. (I also disclaim the breaking of the shoe... seriously, the bag was solid but not that solid.)
Version two was clever and pretty. I found a remnant and decided while it wasn't a perfect color match, it was in the right family of colors. I also had some silk at home, which coordinated with it well. Searching You Tube, I found this video that walked me through the creation of a fancy bag.
Warning: the music is annoying, but the tutorial is worth it. I will be the first to admit, that had I had more time, I think my bag would have had less technical errors. This wedding pouch was a stretch for my "mad sewing skills." Darts and hidden drawstring channels. Also my button whole presser foots was MIA and then once found, the machine and the tension was wonky.
In any event, the bag was cute and while it wasn't technically perfect, it was lovely and made with love.
Inside the bag: I have to say I was super pleased, I managed to make a lined bag... it isn't as easy as it looks and I sort of surprised myself.
The finished bag. I will say the drawstring on this one did not work exactly as I had hopped and I did add some fun beads as well.
The blue fabric is lovely and I have enough left over, that I plan to make a pillow for the newly redone living room.
Having been to the wedding and seen the crisp tailored linens, my first bag fit in perfectly. The second one was romantic and whimsical, but not a match.
Everyone asks me this, when I tell them about my CSA with Wayward Seed. So I am going to try a new blog series-- my wayward seedlings!
So in week one this is what I got---
Vegetables
Allium, Tokyo Long Scallions(1 bunch)
1
Beets, Chioggia(1 bunch)
1
Cabbage, Napa(1 head)
1
Greens, Broccoli Raab(1 bag)
1
Lettuce(1 head)
2
Peas, Sugar Snap(1 lb)
1
Radishes, Pink Beauty(1 bunch)
1
Turnips, Hakurei(1 bunch)
1
Fruits
Strawberries(1 quart)
5
Herbs
Herbs, Oregano(1 bag)
1
When I got home I cut the greens off my root veggies like a good farmer's wife! Seriously, the roots will keep in the crisper in a target bag for weeks, if you remove the greens right away.
I was already making some soup, so I chopped the beet greens and the radish greens and mixed them into the soup. I had planned to use some leftover kale, but used my fresh Ohio organic greens instead. The turnip greens I wrapped in paper towel and put in a ziploc.
I thinly sliced half the radishes and half the turnips and we ate them for dinner.
After dinner, I gave one quart of berries to a friend and picked through the remaining four, discarding any rotten or smooshie berries. I prepped two quarts for the freezer and froze them in ziploc bags.
H ate 1/4 of a quart of berries as he watched me prepping. The remaining berries are in containers in the refrigerator. They won't see Saturday, with all the berry lovers in this house.
I bought L some black raspberries and we ate most of them for dinner on Wednesday night. The remainder, I split with L for breakfast on Thursday morning. I dumped my portion of the berries into the VitaMix and added in the following: 1c. of apple cider, 5 baby carrots, 1 small Chioggia beet, 1 small orange peeled, and 1 c of ice. It was so good. So beautiful to look at too!
I ate two radishes and a turnip for lunch on Thursday. So delish.
E really wanted pancakes. So I made gluten free pancakes and served them with some of the awesome strawberries. Really, these are some of the best strawberries ever. The kids devoured the pancakes and since I am drastically limiting any and all grain, I had two silver dollar pancakes and a huge pile of berries. I also had a boiled egg. I started to feel guilty about the lack of veggies, until I remembered my smoothie from breakfast and decided I was probably ok for the day.
I shelled the peas as I cleaned up the kitchen from dinner and Truffles gets the pea shells and I will cook the peas for dinner Friday night.
Friday was a busy day. I was glad I had prepped the peas ahead. After a busy day of errands and lunch out and a trip to the water park, I was hungry. The kids nibbled left over pizza, peas and yummy Ohio strawberries!
I made myself a stir fry. I cut up very thinly an organic carrot. I grated some ginger (about 3 tsp.) and chopped half an onion.
Heated up the large skillet and stir fried the carrot wheels and onion for about 5 minutes. I then added some chopped Tokyo Long Scallions and a hand full of the uncooked peas, stirred madly for about a minute and then I added the chopped radish greens and some of the firm red lettuce I got in this week's share. I stirred until the greens were mostly wilted and then I poured over the skillet my sauce. The sauce is some soy sauce (the gluten free kind), some fruits of the forest jam, the grated ginger, and some sweet chili sauce.
Cook another minute and serve. I fried and egg and put it on top, but that is optional. You could serve this with rice, to soak up the extra sauce or some bread. Being nearly grain free-- I just ate it with my egg.
So easy and so fresh.
Saturday was a long day away and I made a shake using one of the beets, but nothing else from our share got consumed.
And Sunday was a lazy day. I drank the remainder of my veggie fruit shake and nibbled on fresh lettuce and berries. We met friends out for dinner, so no veggies from the share prepped for dinner.
Monday H was home, so it was work on those veggies time. I made a wonderful salad with the romaine -- which the kids loved just plain! For our salad, I used some of my chive vinegar (which I made from chive flowers from my yarden), oil, fresh ground pepper and some left over goat cheese. Chopped some radish and turnips and apricots and tossed it all together. We enjoyed the salad and crispy baked chicken wings.
Monday night was a post pool free for all. I had some of the left over soup, which had the lovely greens in it.
Monday afternoon before the pool, I made a small gluten cookie crust, using what pretend to be gluten free vanilla graham crackers. I crushed them in a baggie using my rolling pin and mixed them with about 5 TBS of butter (organic) and baked it at 350 for about 10 minutes. I used my small tart shell pan, which I think is 8 inches.
Tuesday we hit the fruit and veggies again. The strawberries I carefully picked through and put in a container are still holding their own. I removed the tops and sliced them lengthwise, until I had about 2 cups of berries. Setting them aside, I whipped the tiny bit of whipping cream I had left with 2 tsp of powdered sugar. I stirred in the 1/3 cup of sour cream and about 2 more tsps of powdered sugar. I grated in the zest of 1/2 of a lemon. Stirred gently to combine and then spread this over my tart shell. I spread the berries over the cream very carefully and then I drizzled over the berries a tbs of mixed berry jam that I had mixed with the juice of half a lemon. (You can heat it gently in the microwave to make it easier to drizzle.)
The kids loved the tart.
As a veggie with our lunch we knocked out the romaine and the radishes and turnips. This time I used some basil flower vinegar, oil, fresh cracked pepper and some feta crumbs.
The kids feasted on the super crispy tiny inside leaves from the lettuce. E, my non veggie lover, announced that that was his kind of lettuce.
For dinner, I fixed the broccoli raab, by sauteing it gently and finishing it off with a bit of lemon juice, the remaining scallions and butter. So fresh and so tasty. I have to say while I really like broccoli raab-- I am in the minority.
So by Tuesday evening, I am left with one beet, half a head of lettuce, maybe a pint of strawberries and the napa cabbage. Oh and the oregano. I am going to dry it. My family doesn't love fresh oregano, so drying it for the winter makes sense.
Had we not been totally consumed with dance on Saturday and exhausted on Sunday, I think we would have knocked it all out. It is also is hard when H isn't home, he can be counted on to help me work through those greens.
While I am not sure I will be able to keep up this long list of what we are eating from our CSA weekly, I am going to try. I think it is important for everyone to see, that it can be done, it looks beautiful on the plate and it is so good for you and the community.
I think you will also notice-- that I hardly work from a cookbook. I am often a fly by the seat of my pants cook... so please remember, if I give you a quantity or an amount-- more or less to suit is probably ok.
The other day I posted about my break up with grain, any grain, all grain, the few remaining grains I was eating regularly.
Let me introduce you to my breakfast replacement:
While it is a slightly complex process, it tastes wonderful and I know exactly what is in it.
The Basic Green Monster
1c of juice (I make my own, see below. In a pinch I have used farmers market apple cider or apple juice. I tried green tea or left over ice tea and well, it wasn't the best choice. I think orange juice would be ok, but I read recently about real orange juice not being so real, so I will leave that all up to you.)
1 c ice (less if already crushed)
2 hand fulls of spinach (I prefer the organic baby spinach)
1-2 inches or to taste raw ginger, unpeeled
1/2 c baby carrots (like 5-7)
1 orange peeled
Blend-- in the vitamix until smooth.
*** variations I have tried... omit the orange and use an apple. Omit the orange and use pineapple chunks. Omit the orange and add in some berries. I tried water melon and I am not sure how I felt about it. I think I should do it again.
What happens when your Sweetie eats your spinach?? Well you get an Orange Monster which is just as tasty, but missing something...
As to my juice base-- I invested in a juicer and this is what I do--
I juice 6-7 medium carrots and 4-6 oranges. If I have apples, I add a few, although the apple juice will turn brownish as time goes on, but it is fine. If I can find them, I add a yellow beet or two. Sometimes I have pears, they work also. This makes enough to almost fill a large canning jar and it will keep in the refrigerator for about 2-3 days.
Next week, I will fill you in on the Chunky Monkey! Another breakfast favorite.
L had her Spring Dance show this weekend. She has been practicing like there is no tomorrow. This year the theme was music. The girls started in 1900 and danced their way through the decades. All the way to 2012!
L's group did a great King Swing... then the two youngest members of the Tap Co danced the heck out of Boogie Woogie Bugle Boy!
While I loved the entire show... the moment that made me cry was the finale, when L came out with a million dollar smile, singing and dancing to Born this Way! Her passion and enthusiasm-- to be who she was born to be.
That is all I want for either of my kids. I want to them to feel that they are free to be who they were born to be. The best part, I don't have a say in this. I firmly believe there are some things about us, that we are just born with. For L it is her passion to dance. Her father and I are not making her do this, we are supporting her. The drive, the enthusiasm, the talent and the desire. That is all her.
This goes for who my babies will marry, if they marry. Who they are at their core was decided before they drew their first breath. L danced in my womb and E napped most of the time, with a stretch every now and again. L has a big personality and E is quieter.
When the time comes, they will fall in love and they may or may not decide to build their own families and I will be happy for them. It isn't for me to decide what or who makes them happy. It isn't for anyone else to decide either... All the gods in the world don't get to decide either-- sure all choices may have consequences in the here after (if there is a here after.) We own our own choices and we were born that way.
I want my children to grow up in a world where they are free to pick which religion, if one, suits them. I want them to grow up in a world where they are free to love and build a family that fits their image, not someone else's.
So last week in a Twitter conversation it was suggested that there was little difference between "digging in the dirt" and "rolling in the deep." I agreed -- both are equally challenging options.
On Saturday night I went to Agora 9 at Junctionview Studios. H and I have gone to this event before. It is a very nice expo by some amazing artists. I love supporting the local art scene. Last night I saw a work I really liked, but I have to think about where I might put it...
We went because my friend is part of a fire group called Quantum Fire. They put on a fire show last night.
Fire Show: directly following the Fashion show: Quantum Fire presents The Primal Urge
The Primal Urge is based on the speech that Aristophanes makes in
Plato's Symposium. (Symposium means "drinking together" in Greek.) The
concepts expounded by Aristophanes in his speech laid the groundwork for
Western culture's romantic notion of soul mates.
It is the first time I have seen him in action. I have seen fire demos before but nothing like the show last night. It was interesting.
So I thought a song about fire would very appropriate for today's Music Monday.
H and I have become those parents and our kids each have an iPod touch. They inherited H and I's old ones. Part me loves the way the kids have embraced technology and the other part of me is contrary and thinks that technology is ebbing into their lives too quickly.
I will say, the iPod does make traveling with kids so much easier. They can bring their movies, tv programs, music and games with them. It does make the long car trip and the plane trips very pleasant for everyone.
The only hurdle for me are the ear buds. Where are they in the backpack, the panic attacks when the kids can't find them. This has been an issue. First I addressed it by being the party to carry the ear buds, then I taught then to wrap them around the iPod. Inevitably they get loose and sink to the bottom of the backpack or the far corner buried under books.
Before our trip to the sunshine state, I decided to address this issue.
Behold the fleece lined denim iPod pouch. The vintage buttons are a nice touch.
The process was very easy.
1. I used a pair of E's jeans. He has the uncanny ability to split the knees of his jeans in such a way, that I cannot patch or repair them. So I decided to put the latest casualty to good use. He wears a size 6-7 slim. These were 6's. I laid the iPod on the leg of the pants, even with the yellow hem stitching at the base of the leg. Once I cut it to the desired length, I then split the leg open at the inner seam. Measure or eyeball the desired width and trim accordingly. In my case I wanted a snug but not tight fit. Remember this is all about little fingers being able to execute the storage and removal process solo.
2. Find some fleece you like. In my case I used some scrap I had. L got pink and E got black monster truck. I used the denim piece as my pattern and cut the fleece to match. Stitch with coordinating thread all the way around. Wrong sides to wrong sides. Then fold in half and stitch following the existing yellow stitching. Making the pouch. I back stitched at the upper corner for extra security.
3. Cut a small strip of fleece. I find using the selvage edge is good way to go. Less stretch and you are going to get rid of that bit anyway, why not put it to use. Carefully stitch into the pouch, about 3/4 inches in. I doubled stitched and back stitched each time. This is going to get lots and lots of tugging and pulling. It needs to be tough.
4. Find a large and preferably slightly raised button and hand stitch it to the front of the pouch. Take your time and do this right. Using embroidery floss won't hurt. Remember this is going to get lots and lots of tugging too.
Then enjoy. This will easily hold your iPod and head phones. No more missing ear buds and your screen is protected.
E today at tea, had arranged the pouch in such a way that it acted as a stand, holding his iPod at the perfect viewing angle. Only my budding engineer could come up with that creative use for my quick denim iPod carrying case.
I would say this process took about 1/2 hour or so. It truly is a quick fix project.
The first grade classes at E's school do a monthly special share. It varies from writing a few sentences to making a how to video. This month we had to make something that involved the Statue of Liberty. E could choose to write a story, a poem, make a poster or build something.
Naturally he wanted to build something. I have to say my building talents are not the strongest and H was slated for a lot of traveling. E and I kicked around Lego creations, foam sculpture and paper mache and chicken wire.
L kept reminding us that we only had a week and that all of those ideas sounded great until you actually got started. She was lucky, in 1st grade her classroom got to do the Flag and we wrote a story and drew a picture.
Then while watching reruns of Bravo's Top Chef, it hit me. We could do a deconstructed Lady Liberty. It is all the rage in food, why not in national symbols?
While we are used to seeing Lady Liberty looking a bit like this:
E and I have transformed her and we proudly present Lady Liberty's Closet:
and inside her closet:
She really is very one note when it comes to color. I think she may need a fashion intervention.
E and I crafted all of her items using stuff we found around the house. The box we got from a neighbor's trash pile. It was exactly deep enough and in very good shape. E and I covered the "doors" in duck tape. JoAnn's has piles and piles of colorful duck tape. The door nobs are drawer pulls from a table I got from my mom but immediately changed the drawer pulls out.
For the closet bar, E and I measured and cut some old pvc pipe we found in the basement. I used a hack saw. H was in the kitchen and yelled down, "Are you cutting PVC pipe." I yelled back, "Like a pro."
For the sandals, we traced E's feet and then cut a top strip. The tablet was easy, just free hand a gravestone shape and cut.
For the torch we used a plastic cup and part of a paper towel roll and duck tape. (on the day of the presentation, we have gold tissue paper all prepared to act as the flames.)
While the building was fun, I think E enjoyed dying a length of old white sheet, using hot water and Rit Dye. He got to pour and stir.
The only part of Lady Liberty's outfit, which we bought was her crown. It was a 99 cents foam crown, which came in grey sparkly. The down side is it only has five points and the real one has seven points, but we are working with what we have and seriously, the crown is sparkly. (Even after we painted it.)
While many people thought me using a hack saw was the scariest part of this project; it wasn't. The scariest part of this project was allowing E to spray paint the props. We found, at JoAnn's, blue spray paint that is pretty close to the correct color.
So last Saturday and again on Sunday for touch ups, I placed the sandals, torch, crown, and tablet on newspaper and shook the can of paint and handed it to my six year old. Crazy I know. It was not lost on me, as he began spraying, that this was a spectacularly poor idea.
Although with some coaching, he actually did a pretty good job.
So for about $15, E and I have built something for his project and he is excited to share his creation and the fun facts he has learned about the Statue of Liberty. He has note cards all set, with each clothing item on it in big letters and 1-3 sentences about that item on the back.
I hate to be cliche, but sometimes you just have to think outside the box.
For the last few weeks I have been very busy with DIY projects. Some smaller than others in scope, nonetheless the creativity has been flowing in full force. Pinterest is the place I go when I am looking for a tutorial lately. There are so many wonderful DIY/craft bloggers out there... Pinterest makes it so easy to find them.
I have been experimenting with fabric necklaces/scarves on and off for a year. I had an old t-shirt I thought would make an interesting necklace/scarf. I found two tutorials for making one with braided lengths of fabric. I was drawn to this, because it creates a more scarf like weight to the necklace. It makes it more of an infinity like scarf.
The first tutorial was on this old dress and I liked it, but I was seeking more weight so I when I found this tutorial on tip junkie via nette, I broke out my scissors.
Since I was using cotton t-shirts, mixed with one poly blend tee, my braids have a very different feel to them. What appealed to me about nette's version is it has a weight and body to it. After my Pinterest post, a friend and I were tweeting back and forth and he accused me, in jest, of being a magpie.
I don't deny it. Sometimes I am inspired to try something and even verbatim based on a tutorial. More often than not, I like to use a variety of tutorials to shape my thinking. It is creative inspiration. I have accepted that for knowledge, I can read from a book or listen to a lecture. That works for me. If however, I am physically creating something, well then I learn best by doing. I don't seem to be able to translate something that should be in 3D form from a flat page.
But if I can walk through the steps or as in the case of french seams last year, if I can watch a video, I seem to pick up the new skill very quickly. (After watching the video like a million times.)
So after the back story, I know you are all wondering what I came up with.
So here it is...
After this photo, I have tweaked it a bit and cleaned up the edged just a touch.
My process:
First I cut the t-shirt strips. I used three shirts. The stripped one was a cotton long sleeved shirt from Old Navy and was over 6 years old. It was way stretched out. The purple, was a tank top, size 1X from my mom's closet. It was faded and had very little stretch left in it. The grey is a poly/cotton blend from my mom's closet. It was newish, but had a stain in the middle. I love the feel of this shirt and it curled beautifully when I cut my strips, something the other two did not do.
After I had the strips, I gathered them in a variety of groups, so I could braid them. I knotted then on one end and then using a pin, pinned them to the office chair, so that I could make nice tight braids. In total, I braided three ropes. (I did this the other night when the kids were having a sleep over. The girls jumped in and "helped." I let them make bracelets using scraps of fabric, similarly braiding the strips together. L even made a key chain with some of her braids for her backpack.)
I also used two wider strips of the grey shirt as a base.
Building the scarf was a bigger challenge than I thought. I tried a few methods and settled on making one rope out of the three braided sections. Then I used the two wider grey strips as my base and attached the rope using a smaller braid to wrap.
The result is a long infinite type scarf that I can them double over and arrange to suit myself.
While it is not as neat as Nette's version, it does have the weightiness I was hoping for and it fits nicely. I have a few more t-shirts on the pile, so I may try it again. I think L would like one too...
Today I welcome a very special guest blogger to Thoughts from the edge, my daughter L. She came to me with a shopping list and some ideas and asked if I would take her to the craft store. After seeing her beautiful creations, I suggested she blog about the process. She agreed and wrote this post, with only minor spelling and editing assistance.
My Craft
by L
I made squishy doughnuts and I wanted to tell other people how to make them!
What you need: you will need scissors, acrylic paint, round sponges, and carpenters glue. You can get these at Michaels.
Here are the steps you need to take to making your doughnut:
1: If you are not making a jelly filled doughnut take your scissors and hollow the middle but don't cut all the way.
2: Using your acrylic paints pick a color and paint your doughnut, pick a new color to make a design for example, I did a zigzag.
3: If sprinkles are needed use beads and carpenters glue to glue on the beads. You might have to reglue them but that's ok.
I think Grey is a fascinating color. I actually like smokey greys as a color choice. I have more than a few grey sweaters in my closet. While I favor the deeper greys, the smokey color, I do like the light greys and the heathers as well.
As I was thinking about what to photograph this month, I was thinking about shades of grey. There is silver, pewter, steel, smokey, gunmetal, light grey, dark grey, weathered grey, battleship, ash, charcoal, cadet, blue-grey, green-grey and the list I think goes one and one. Grey can be a soft shade or a harder edged shade.
In the programing world there seems to be a few less shades than at the paint store:
In thinking about photography, it seems to me that Black and White photos are really all about shades of grey. In this photo challenge, in editing the photos, I resisted the urge to change the photos to B & W.
I also do wonder which spelling is correct, Grey or Gray. I have found that in the US we favor Gray and in Britain they favor Grey and both are equally correct. So just like much of life, the spelling of grey is more or less gray area and not exactly black and white.
I have to say, I think gray was the easiest color yet. I am currently sweating this weeks color! Yellow!!!
So Allison Lehman is doing another photo challenge for February. An iPhone (or phone camera) photo challenge. It is similar to NOPHO, in that it is a weekly challenge, with a set theme, and a judge and a neat prize at the end for the winner.
I am in! I love these little challenges. As an extra challenge to myself, I plan to write a poem a week, to go with my photos or somehow is related to the theme, or ideally both.
The challenge is open to anyone, you must submit all 4 weeks to be eligible for the prize and these have to be phone pics! It really is that easy and Allie has a button on her blog side bar, for easy uploading.
L learned about claymation this summer during her art camp at The David Myers Gallery in Uptown Westerville.
This fall she applied the concept using some of her Japanese erasures. She has H's old old digital camera, which makes uploading the photos challenging, but we managed it this morning and found free software to allow us to share the slide show with you. This "video" contains over 90 still shots. Make sure enable the sound, because her choice of music is perfect.